In this tutorial, I will show you how to fill up a (jpeg type) fill-in invitation from the computer using “PAINT” program and print your invitation totally filled up with all the needed information and save time in writing them yourself one by one on the invitation by hand.
DISCLOSURE: This blog and post contains affiliate links. This means I may earn a commission should you chose to sign up for a program or make a purchase using my link.
HOW TO FILL UP A JPEG TYPE INVITATION FROM THE COMPUTER
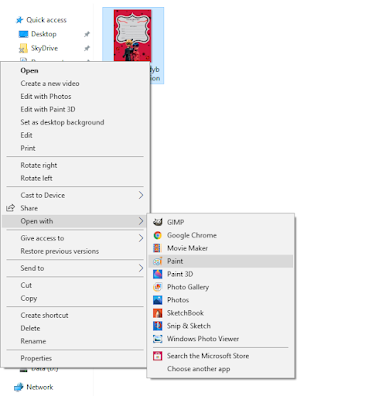
1. After downloading and saving the invitation (in jpeg format) to your computer, locate the file and right-click on it and in the box that pops out, click “open with” then choose “paint” to open the picture in the program. NOTE: Click on image below for full clear size
2. In “PAINT”, if the image is the size of the whole screen (as seen below), just go down to the bottom right side and click on the minus “ – “ sign to reduce or zoom out the size of the image. If the image is already the right size in "PAINT", proceed to the next step. NOTE: Click on image below for full clear size
3. We will now proceed in adding some texts to fill in the details of the invitation. To do that, click on the “ A “ or text icon above. NOTE: Click on image below for full clear size
4. Then click on the area in the invitation where you want to add the text so a text box will appear. In the text box, type in the necessary details. NOTE: Click on image below for full clear size
5. Choose your desired font, size as well as colors of the texts by scrolling down the fonts, number drop down menu and clicking on the color palette from the text tools above. Don't forget to highlight the whole text before doing so. NOTE: Click on image below for full clear size
6. Once you’re done with formatting the font, size, and colors of your texts, move the cursor anywhere on top or bottom of the text box and take note of the “move cursor” icon that appears then drag the text box to position the text properly in place on the lines. NOTE: Click on image below for full clear size
7. After positioning the text properly, make sure to lock the text in its place first before proceeding to create another text for the next line by closing the text tool, to do this just click on any tool icon such as “pencil, eraser, etc.” to get away from the text tool for awhile and then click on the text tool or “ A” icon again so a new text box will appear, type in the necessary details then drag the text box to position the text properly in place for the current line. NOTE: Click on image below for full clear size
8. After positioning every text properly in place, do the same steps as mentioned in #7 above all over again for the next lines until everything are completely filled up. To save the invitation with all the filled up details, go to “File” then point to “Save As” and click “JPEG picture” to save the updated invitation to your computer. NOTE: Click on image below for full clear size
Check out the sample printed version of the invitation above with details already filled from the computer. Information are for sample purposes only. NOTE: Click on image for a better view
GET A LOW-COST AND QUALITY PRINTER FOR HOME PRINTING
Print FREE printables for home DIYs and more! I'm using "HP Ink Tank 115" single function inkjet printer in printing the sample invitations above, I bought it online at shopee.ph. It is a quality and low-cost printer for home printing that uses tank for the ink.
It needs a total of 4 ink bottles (CMYK) to refill the tank, you can save even more by refilling with universal ink. Just make sure the ink is compatible with the printer model before deciding on a purchase.
I'D LOVE TO HEAR FROM YOU!
If you got any thoughts or questions regarding this post, feel free to interact and write it down in the comment box below. I'd be happy to hear from you. Thank you so much for viewing and reading.
RELATED POSTS:


Comments
Post a Comment